
Japanese Pumpkin Cheesecake
This post may contain affiliate links and I may earn a small commission when you click on the links at no additional cost to you. As an Amazon Affiliate I earn from qualifying purchases.

COME AND GET IT! JAPANESE PUMPKIN CHEESECAKE IS HERE!!!! I am so freaking pumped to share it with you because this cheesecake is the slaps. It really is.
And just to clarify, we’re talking about Japanese pumpkin flavored American cheesecake, not pumpkin flavored Japanese cheesecake. There is a HUGE difference between the two.
KABOCHA (JAPANESE PUMPKIN) vs. SUGAR PIE PUMPKIN
Kabocha squash (Japanese pumpkin) have a nutty, earthy flavor that is similar to sweet potato mixed with pumpkin. They also have a fluffy, somewhat dry and crumbly texture.
Sugar pie pumpkins (used in typical pumpkin pies) are sweet and have a moist texture, similar to mashed yams.
JAPANESE CHEESECAKE vs. AMERICAN CHEESECAKE
Japanese cheesecakes are light and fluffy. We’re talking ultra light, like a soufflé or sponge cake. Your fork goes right through the cake with little resistance. They’re jiggly when baked because of their airiness and they contain less cream cheese than American cheesecake. The taste is a subtle cream cheese flavor and they’re not very sweet.
American cheesecakes are denser and sweeter in comparison. They give some resistance when you sink your fork in. And when you take a bite, the flavor is cream cheesy and sometimes tangy. Once baked there is absolutely no jiggle.

Personally, I’m partial to the American style cheesecake and Kabocha squash, so here we are.
The Kabocha offers a subtle twist on the pumpkin flavor we all know and love. It’s a little more complex and a nudge more savory. Since there isn’t as much sugar in Kabocha, the cheesecake isn’t overwhelmingly sweet. And the pinch of five spice in the whipped cream is the perfect amount of je ne sais quois.

As with all cheesecakes, this one takes time and patience. While the recipe may look long, I promise it’s not difficult. I’ve included a lot of extra information and detail so that any bakers new to cheesecake can feel confident moving through the steps.
I hope you give this recipe a go. It’s one of my favorites so far on the blog and now is the perfect season to make it!

The Recipe
Makes one 8x4-inch loaf pan (🔥Size Queen)
Ingredients
Oreo Streusel (Optional)
5 Oreos
2 tablespoons (26 grams) sugar
1 tablespoon (8 grams) flour
2 tablespoons (28 grams) butter, cold and cut into 1 cm cubes
Oreo Crust
10 Oreos
3 tablespoons (42 grams) butter, melted
Cheesecake Filling
1 small kabocha squash (you’ll only need 3/4 cup of squash puree) (🔥Squash Swap)
1/2 cup +2 tbs (124 grams) granulated sugar
1/2 teaspoon (2 grams or 3 ml) vanilla extract (optional)
7 ounces (140 grams) full-fat cream cheese, room temperature (🔥Quick Zap)
1-2 large eggs, room temperature (🔥Egg-cellent Choices)
1/2 cup (115 grams or 118 ml) heavy cream, room temperature
Whipped Cream Topping
1/2 cup (115 grams or 118 ml) heavy cream, cold
2 tbs (16 grams) powdered sugar
1/4 teaspoon (1 gram) five spice powder (🔥Spice Rack)
Instructions
Roast Kabocha Squash (🔥Squash Swap)
Set your oven rack to the middle position, then preheat the oven to 350°F. Line a baking sheet with aluminum foil or parchment paper.
Cut the squash in half and remove the squash seeds and stringy fibers. Cut the squash into 2-inch wide crescent shaped slices. Place the slices on the baking sheet, then cover tightly with aluminum foil.
Bake until the squash is tender when pierced, 60-75 minutes. Let cool, then use a spoon to scoop away the flesh from the green skin. Reserve for later.
Make the Oreo Streusel (Optional)
Line a baking sheet with parchment paper. Place the Oreos in the food processor, then pulse until they’re large chunks. Add the flour and sugar then run the processor continuously until they’re fine crumbs.
Add the butter, then pulse until it’s the texture of wet sand and the mixture begins to slightly pull away from the sides of the bowl.
Dump the mixture onto your prepared baking sheet. Then, use your finger tips to pinch together some of the crumbly dough into varying sized clumps. Spread the streusel in the pan, spacing and spreading out the dough as best you can.
Bake for 10 minutes, then cool and reserve for later.
Make the Oreo crust
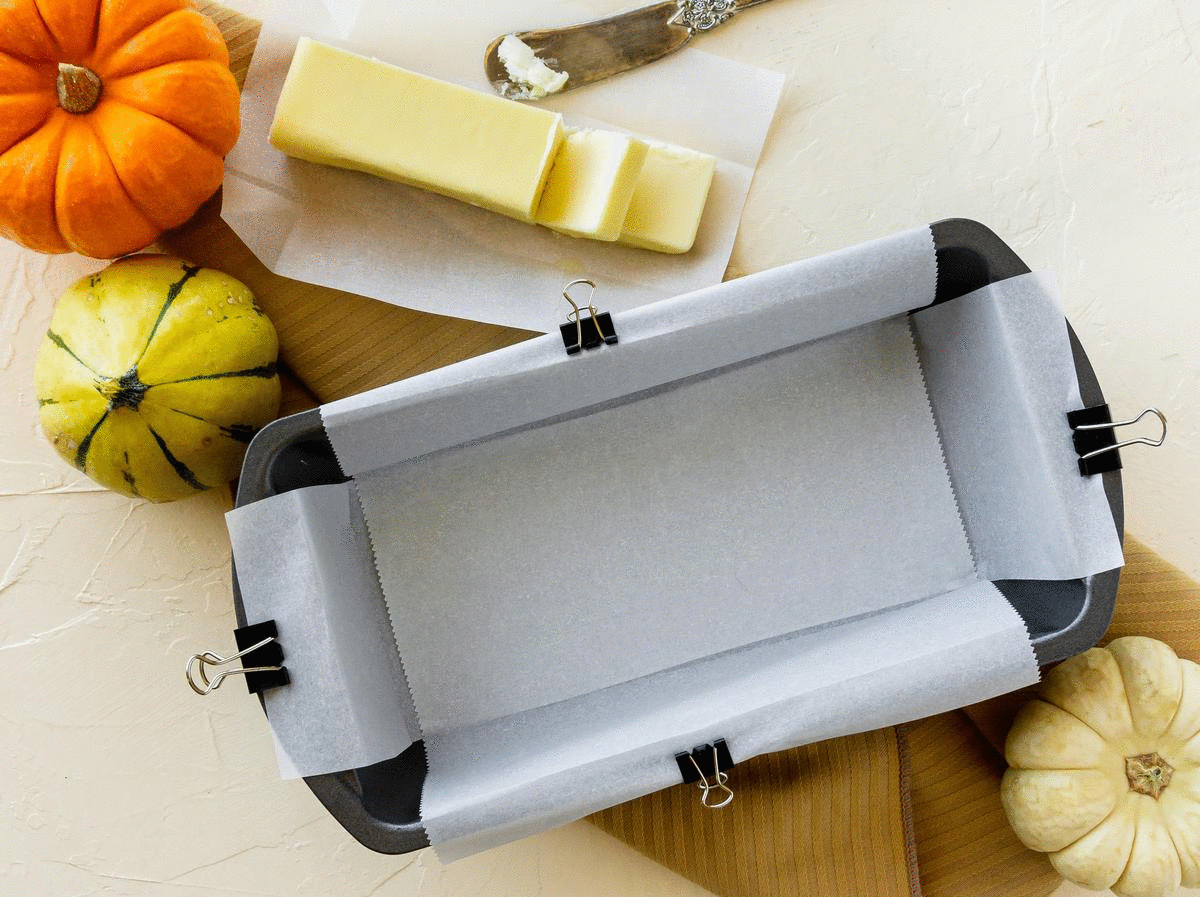
Line an 8x4 loaf pan with two overlapping strips of parchment paper. Each paper should be long enough to cover the bottom and sides of the pan, with some overhang on each side (see process photos above for more detail).
Place the Oreos into the food processor, then pulse until they’re fine crumbs. Add the melted butter, then process again for 20-30 seconds to distribute the butter.
Transfer the mixture to your loaf pan, then spread it in an even layer. Using a tall glass or your fingers, flatten and compact the crust into the pan. You want to really compact it, otherwise you risk having a weak and crumbly crust when baked.
Bake for 10 minutes at 350°F, or until fragrant. Remove from oven, then reserve for later. Reduce the oven temperature to 325°F.
Make the cheesecake filling
If you DO NOT have a food mill — Transfer the squash to a food processor. Pulse a few times to break up the pieces, then run the processor continuously until the squash forms a smooth ball, approximately 1 minute. Measure 3/4 of a cup of squash for the filling (the rest can be used for other pumpkin recipes!) (🎩For Chunk-Free Cheesecake).
If you DO have a food mill —Pass the squash through the food mill fitted with the fine disk. Reserve 3/4 cup for the filling (the rest can be used for other pumpkin recipes!)
In a large bowl, beat the cream cheese until completely smooth. Then add squash, sugar and vanilla (if using). Mix until fully incorporated and homogenous.
Add the eggs and heavy cream, then beat until completely homogenous, at least 1 full minute.
Bake the cheesecake
Double check that your oven temp is at 325°F. Boil 7-9 cups of water.
Set the loaf pan inside an empty 9x13 baking dish, or large roasting pan. You will be pouring water into the larger baking dish so that the water surrounds the loaf pan. Pour enough water to submerge 3/4 of the cheesecake.
Carefully transfer everything to the oven. Bake for 40 minutes; the center will still be jiggly and a skin will have formed on top. DO NOT REMOVE FROM THE OVEN!
Cool the cheesecake
When the cheesecake is done baking, turn off the oven. Then use a wooden spoon to prop the door open an inch or less (🎩Crack Attack)
Let the cheesecake cool in the oven for at least 75 minutes. Then carefully remove the loaf pan from the water bath and set the pan on the counter to cool completely.
Poke several small holes in a piece of aluminum foil and cover the cheesecake with the foil. Refrigerate for at least 3 hours, preferably overnight.
Whip cream
Right before you’re ready to serve, in a medium bowl, combine the heavy whipping cream, powdered sugar, and five spice. Whisk until the cream holds its shape, about 3 minutes.
Serve
Carefully blot the top of the cheesecake with a flat paper towel to remove any moisture from the surface. Using the parchment overhang as handles, lift the cheesecake out of the pan and transfer to a cutting board.
Cut the cheesecake in thirds, then cut each third into 2 triangles. Transfer the pieces to serving plates. Serve with a dollop of whipped cream and Oreo streusel.
Enjoy!
Storage: The cheesecake can be stored covered in the fridge for up to one week.
Hot Tips 🔥
SIZE QUEEN — Sorry, but size does matter… it impacts the duration of your bake! 6-INCH ROUND: bake for 40 min
CUPCAKES: bake for 20 minutes
DOUBLE BATCH? Bake in 9x9 pan for 60-75 min depending on your oven
SQUASH SWAP — Canned pumpkin puree can be substituted if you are short on time or can’t find Kabocha. You’ll need 3/4 cup of canned pumpkin. However, Kabocha squash will offer a more distinct and earthy flavor than canned pumpkin.
QUICK ZAP — It is IMPERATIVE that your cream cheese is room temp! Cold cream cheese will produce a lumpy cheesecake with pockets of unflavored cream cheese. If you don’t have time to wait for your cream cheese to come to room temperature, zap it in the microwave for 20 seconds.
EGG-CELLENT CHOICES — Eggs alter the density of your cheesecake. For a dense cheesecake, use one egg. For lighter cheesecake, use two.
SPICE RACK — Five spice powder is my favorite with pumpkin. The powder is composed of cinnamon, cloves, star anise, Sichuan peppercorn, and fennel. It offers a beautiful autumnal flavor with a slight twist. If you don’t have five spice, simply swap in ground cinnamon, cinnamon spice, or apple pie spice.
FUN FACT: Apple pie spice and pumpkin spice are exactly the same blend (cinnamon, nutmeg, allspice, ginger) except apple pie spice adds cardamom while pumpkin spice adds cloves.
Tricks 🎩
FOR CHUNK-FREE CHEESECAKE — This step is optional but highly recommended, especially if you did not use a food mill: Pour the mixture to a fine mesh sieve set over a medium bowl. Use a wooden spoon to press everything through, especially small chunks of pumpkin or lumps of cream cheese. It’s tedious work, but this extra step ensures your cheesecake is smooth and chunk-free.
CRACK ATTACK —The key to an un-cracked cheesecake is a very slow and gradual cool down. If you open the oven door too wide or remove the cheesecake from the oven, it will crack. So, use a kitchen utensil to keep the door open an inch and be patient!